Sunday, January 22, 2017

I Physically Can't Draw

  All artists that strive to become better artists have once reached a point of frustration. Frustration, in which they think they can not create an art work correctly. They keep erasing and erasing and think they will never become better. I can relate to this and I think many artists can too. It feels like giving up would be the best option. I should say this now, giving up is not the best choice if becoming better is something that they are passionate about. I know some people that have accomplished any obstacle that have been thrown to them.
  Everyone knows Pablo Picasso as a famous artist. He as well had some obstacles to go through. He suffered with Dyslexia. Dyslexia is the switching of letters and words in the brain which causes a difficulty in reading and writing. In his early years, he did poorly in school but he still created amazing paintings.
   Although Picasso suffered through a mental illness, some have to fight with a physical disability. In Norfolk, Virginia, there lives a  man named Peter Longstaff. As well as Picasso, Peter is a painter but he paints a little differently. When he was born, he was born without arms and was put at an advantage. He then adapted and created beautiful landscape paintings such as these.

Clouds - Peter Longstaff 

He didn’t let his disability get to what he loved doing.
  Another well-known artist much younger than Peter is Mariusz Kedzierski. He is a 23 year old, self-taught artist who began to love art at the age of three. He learned how to draw and paint at the age of 12 without having any arms, until he was forced to stop for medical reasons. He felt like he couldn’t paint for the rest of his life. He used his portraits to communicate his pain of his disability. Until 2008, he had a life changing surgery that gave him the ability to draw again. He draws by holding his pencil against the ends of his arms. He creates beautiful drawings such as these.

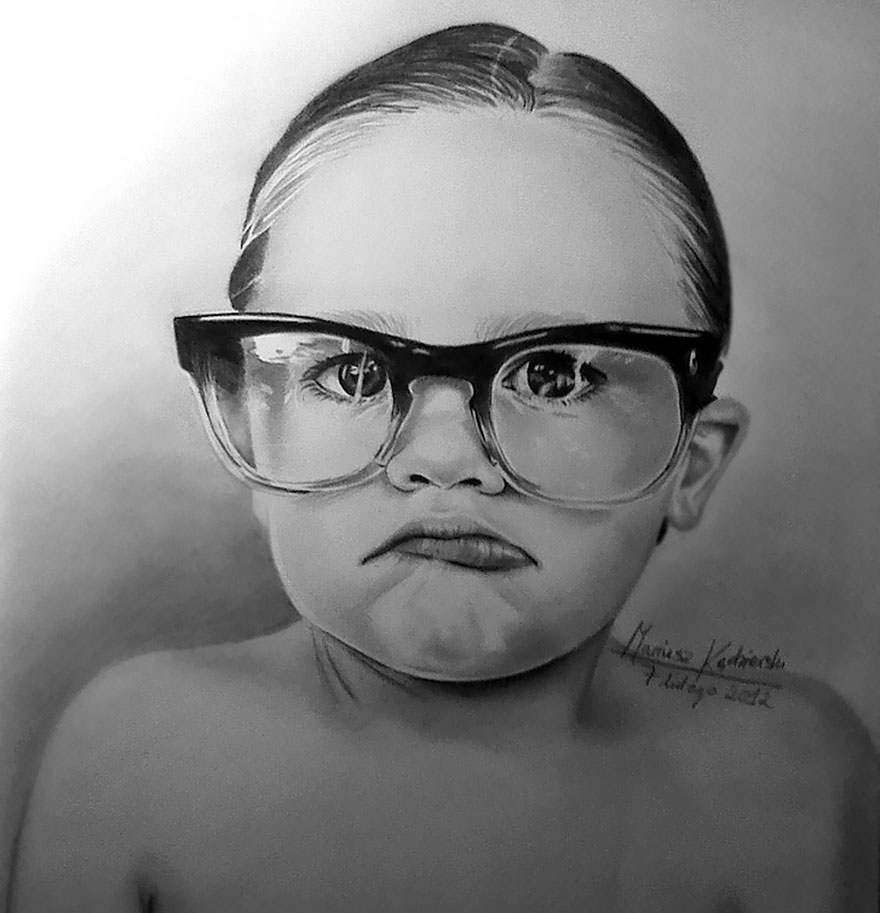
He won second prize in “Best Global Artist” in Vienna in 2013. “It’s not difficult to be an artist or whoever you want to be if you truly believe that you want to do it. Then nothing stops you. For me, a disability doesn’t mean that I can’t live my own, great life.” He says. He didn’t let the disability of having no arms let him down. He still continued and created amazing, realistic drawings.
  No matter what obstacle an artist is in, they should take a moment and realize that they truly can do it if they keep trying. These artists have and why can’t they? So if you’re struggling, don’t worry. You’re not alone, we’ve been there and I know you can still accomplish it. Good Luck

Saturday, January 7, 2017

24 Different Colored Waxes!

   One of the most remembered tool in people's childhood is their trusty crayon. A crayon is a pencil/stick of colored chalk or wax that's used for drawing or coloring. Crayons are mostly used for coloring pages or books in which many children have (If they don't have a tablet yet). The most common brand of crayons that people are familiar with is Crayola, but that wasn't the first true crayon invented.
   Encaustic Painting is the latest technique dated all the way back to the Greeks. Encaustic Painting is a wax based paint that consists of beeswax, resin (crystallized tree sap), and pigment. Heat is used to activate the paint in which the artist applies on the canvas (preferably wood) with the brush of their choice. Layering is the most common technique used for encaustic painting for it's translucent strokes. Pastels were then used commonly in the 18th Century by many artists. Pastels are similarly related to crayons based on their shapes and size. They both come in a variety of colors and have pigment substances mixed with other materials to keep it's shape. Then finally on March 31, 1885 in New York City, Edwin Binney found "Crayola". Crayola is the most common brand that we know today that provides us with markers, crayons, etc.


   There are other types of crayon brands out there. Some don't compare to Crayola because of their lack for advertisement and quality but they still exist. I quickly checked reviews on Amazon about what people thought for each brand I chose (Crayola, Cra-Z-Art, Prang, RoseArt, and Scholastic). Out of 311 people, Crayola got 4 and a half stars (out of five)
Cra-Z-Art (out of 139 people) received a 4.1 stars out of 5
Prang (60) received 4 out of 5
RoseArt (23) received 3 and a half out of 5 and
Scholastic received 4 and a half out of 5 by 16 people. 
  These numbers might not reliable. Especially since RoseArt and Scholastic were only reviewed by 23 and 16 people. So I chose to compare the two different types of brands by coloring them on a sheet of paper and evaluating them after I finished. I chose Crayola and RoseArt for the lack of information that RoseArt had of its quality. When I finished, I came to the conclusion that Crayola was the best choice because of its great balance between wax and pigment. It was easy to control because I didn't need to apply any pressure for it to color the way I wanted it to. They don't break easily either. On the other hand, RoseArt had a higher portion of wax than pigment so I wasn't sure how the coloring was going to come out when I finished. It's much easier to break. They both do their job for a good price but Crayola would be the better choice.
   Now unless you're very picky about the type of crayon you use, it doesn't really matter what type of crayon brand you choose. Children don't mind what the crayon brand the crayon is, just as long as they can color their coloring book with it. It's very curious to know how the crayon came to be and how it affected our childhood in the long term. Some crayons are better than others but you still have the choice of choosing the best crayon for you.
Crayon Art

OUCH

   Tattoos seem as scary as they look getting them. Especially knowing that ink is being injected into your skin forever makes them even scarier. No matter how painful it may look, tattooing is a different type of art style with different types of techniques. It may not seem like it but, why do you think the people who create the tattoos are called "tattoo artists"? They all have their different tools, and there are different types of way to use them.
   Every tattoo artist needs their tools. They need a machine that resembles a dental drill called a tattoo machine. It requires a  sterilized solid needle that goes up and down, puncturing the skin at around 50 to 3,000 times per minute by a machine that draws ink into the needle. Each time it enters the skin, the needle enters by a millimeter and adds a little bit of ink. What keeps the machine running is an electric motor that requires a foot pedal that control the vertical movement of the needle. There are more needles to be mentioned but they depend on whether what tattoo the costumer is getting. These are just the basic tools that a tattoo artist needs.
   The video above is to show how tattoo needle(s) looks close up when they puncture the skin repeatedly.
   First the artist has to outline what they will be creating. It's to create a basic shape on the skin. It's normally done with a group of needles as shown on the video above. You can view outlining (or lining) as a way to create a coloring book on their skin.
   They then start coloring the tattoo itself. Most people use a series of small overlapping circles to fill in a space of skin. They may also sweep the needle across the skin with a variation of pressure to create a "shading effect" on the tattoo. Coloring can also be very crucial to creating a tattoo. Coloring is mostly done from darkest to the lightest colors. Since the needles have to be cleaned between colors, imagine using a paintbrush. If the paintbrush was used for black and then used again to color with white, both of the colors would smear no matter how hard the artist tried to remove black from the paintbrush. It was hard to remove because black is a dark color. Especially if the artist wants to use a bright color afterwards. The tips of the needles are treated the same. Each time the artist wants to switch between colors, they would have to completely clean the tips of the previous color. Coloring from darkest to lightest also ensures that they don't mix.
   Shading is a little different to what others are use to. Almost all tattoo artists use black ink for shading. One way to apply the ink for it to appear "darker" or create a "shade" is to apply variation of pressure between the strokes. The variation of pressure can add the effect of a lighter or a darker shade. Another way to create shade is to add white with the black ink so that there can be a grey color/shade on the tattoo. Some also add water to the ink to create a lighter shade of color from the ink. It's very unlikely to add water however because adding water into ink would irritate the skin. Shading can be very crucial when it comes to a good tattoo artist or not. It really shows the depth of the tattoo and makes it interesting to look at. Shading would be the best
   Creating tattoos require a lot of work and precision, and so does a painting. I consider Tattoos to be art that can be placed on human skin forever and for everyone to see. The tools and techniques might seem different but drawing and painting are completely different compared to each other. I say tattoos lie right in between them. There might be other types of techniques out there but now you"ll know how to create a tattoo correctly! (Just don't practice on anyone please....)
Goodluck!
Landscape Tattoo


Saturday, December 31, 2016

And We're Blendingggggg

   One of the hardest and least favorite part about painting would have to be Blending. The most common reason is because it never comes out the way the artist wants it. It also varies between what the artist is using such as paint or pencil.
Blending and Scumbling - Acrylic Paint Lesson
Female Nose
              
   Above shows how blending appears in both drawing and paint. It's just using different shades of color being combined together smoothly to show a nice shade. It's commonly used in realistic drawings or landscapes to show how realistic the artist wants the painting to be.
  Blending was very difficult to accomplish for me, To this day, I still can not make a nice blend on any of my drawings. I've realized that the reason I couldn't create a nice blend was because I've been doing it wrong. I've always used my fingers to blend graphite onto the paper. It wasn't until I read a website about blending that using your fingers to blend the graphite on a paper is the worst way to do it. The reason for this is because fingers have natural oils and trying to blend graphite onto the paper will just smudge the graphite onto the fingers rather than the paper. I should also add that every time I used my fingers to blend the lead, it would never blend correctly. The graphite always just stuck to my finger and damage the paper every time I struggled to rub the graphite back onto the paper. It wasn't until I tried erasing to start over, that the graphite was rubbed in the paper and it would not come off. I ruined the drawing and I couldn't do anything about it anymore. What I'm trying to say is that, don't ruin your drawing by blending incorrectly.
  The best tools to blend on a drawing are Blending Stumps and Tortillions. They are sticks of rolled up felt paper with pointed ends. The difference between them are not that significant. A tortillion is harder than a blending stump, so it requires more effort to blend graphite onto a paper. It should also be used at an angle or else the tip would collapse and it would have to be fixed back into place with a toothpick or any other small pointed object.
   
Arya Stark (Game of Thrones) Speed Drawing
   To blend with a blending stump requires to use the tool and push the graphite back and forth until the shades are combined
  There are alternative tools to blend. For example, tissue can be used. It's commonly used only for lighter shades or else the graphite will transfer all onto the tissue just like a finger would. A Q-tip could also be used to cover large areas unless the tip is twirled to a fine point. 
   Blending for paint is a completely different story. I watched a really great video about blending acrylic paint onto a canvas. he explained what it was and how he does it. The way blending woks for acrylics is a lot of layering of the paint. Acrylics dry quickly, so using a damp brush would work perfectly to applying the paint, Applying the 1st layer would turn out transparent so it's recommended to put a second layer to make sure the paint can look opaque. The paint left on the brush can also be used for scumbling which is moving the brush in circles constantly to create a dry effect. It's commonly used for clouds and other types of fluffy strokes. Blending can also occur with scumbling by creating the effect on wet paint. 
  While the paint is still wet, apply the paintbrush (with remaining paint still from previous color) with white paint. It's okay to clean the brush off from the previous color, but it's recommended to leave the previous color on to create a lighter shade using the same color. You want to make sure that when blending the colors together, the paint is still wet. If not, then wet the paintbrush slightly and continue.
   Blending can occur by just softening the edges of the paint. But the description above can help with blending two different colors together, 
   Painting might be a bit harder because it's unable to go back but it's still fun to try it out and practice. Practice is key when becoming better. Not only have I learned more about blending with both drawings and paintings, I hope you have too. I can't wait to try it out on my next piece!

Friday, December 30, 2016

This Coloring Book Belongs to an Adult

   Most of the coloring you have done in your life was likely during your childhood. If not, then.......I'm sorry. Even if you haven't, you probably have in some point of your life and realized how fun coloring can be! Many people have different objectives when coloring but most people go for how nicely they can color the page without having any of the color go outside the lines. No matter how you color it, we can all agree that coloring is fun and even though we don't do it as much anymore, we believe that coloring should only occur when we are children. Well, not exactly.
   The coloring books you had as a child were simple (or at least I hope they were), where they had either princesses, flowers, or superheros. No matter what they had, it was still fun to color. It really helps to go back to those "childhood days" where people can be themselves because they can color the way they want to. It gives people the freedom to be creative in their own way.
  This may be one of the reasons a lot of therapists/psychologists consider coloring to better their patients. For example, Ben Michaelis, a clinical psychologist, recommended coloring because it relaxes the amygdala which is the fear center of the brain which allows the brain to rest. Carl Jung another famed psychologist suggested coloring for his patients as well because it reduces stress and cause for them to become calmer. He suggests for his patients to color mandalas which are geometric figures that are often representations of the universe in Hindu or Buddhism.
   The image above shows an example of a mandala. You can tell that they look complex and very detailed. This may be one of the reasons they take awhile to completely color.
   When I explained about how drawing can help with multitasking with the brain and the fingers in my later post, multitasking can also apply in coloring. Psychologist Gloria Martinez Ayala says that the "action involves both logic, by which we color forms, and creativity, when mixing and matching colors." In other words, coloring can help with both logic and creativity. When you color a dog you won't obviously color the dog purple, because logically a dog will not have purple fur (unless you freely want to color a dog purple, no one is stopping you). Logically people would color the dog either brown, black, white, or any color that a dogs fur normally would be. This helps with the brain to logically choose the right choice, while also giving it creativity of mixing colors together to see how the page will come out. In a coloring page filled with farm animals in a meadow with trees and flowers, people can color it with any colors they want. This builds their creativity of choosing any colors they would want and see the outcome of their choices.
   Peoples focus can also become better with coloring. It secretly helps with the brain by focusing on constantly trying to make sure that non of the color passes through the lines. This may also be the reason that children's coloring books are much simpler than adult coloring books in which adult coloring books include mandalas and detailed pages.
   So even if it's just for fun or just to get your mind off things. Coloring can be both for children and adults. Adults have many benefits to it and children do too! It's not fair for children to only have the advantage. 

Sunday, December 18, 2016

Shady Shadings

   There is one very important aspect to drawing that gives it life. Without it, all drawings will be dull and stuck in 2D. So without it, people won't see drawings the way they do today. Shading can be either really easy or really difficult. For me personally, it is very difficult because I never really tried different types of shading other than just placing many lines on the paper and smudging it with my finger. Honestly, it works except my fingers get really dirty and the paper starts to become damaged by the many times of rubbing lead into it. So, I have to be very limited on shading in my drawings. Little to my knowledge, there are different types of shading and in some they can be blended to create a shade. That's very useful because then I don't damage the paper as much as I already do while drawing.
   The first type of shading I'll explain is the most common throughout artists. The Back and Forth Stroke consists of moving the pencil back and forth quickly on the paper to create what looks like numerous lines on the paper.
 
   The picture on the left shows the Back and Forth Stroke. You can tell that from the lead, the pencil was being moved back and forth quickly to show a small fade all together. To show a darker shade with this technique I suggest to either keep the lines closer together or to press harder on the pencil. If you keep the lines closer together, it will just give the illusion of more lines being created, so a darker shade is shown. When you press your pencil harder, more lead is given on the paper so that could be an alternative as well.
   The second form of shading is called the Hatching Technique. It consists of small lines being created close together to create a fill of color from far away. The more dots you add closer together causes a darker shade in this technique. Cross-Hatching is somewhat similar to Hatching except there is one more aspect to add. Cross-Hatching contains lines going one way and another set of lines going the other way. 
   Cross-Hatching looks much darker than Hatching and more layers can be added to create the shade darker. The only way to make Hatching darker is to draw more lines and compress them.
   Stipping is similar to the Hatching Techniques except instead of small lines, small dots or dashes are created instead.
   If you notice closely to the photo above, the shading of the pedals have really small dots. This would be an example of Stipping. Unlike this picture, stipping is normally used for adding detail for smaller features such as eyes or facial hair. It's also very useful to blend them all together to fade it all together. To create the shade darker, you just simply add more dots in the picture.
   Lastly, I will explain Scumbling. It's quite easy to do actually. You just move the pencil in a circular motion in the same general area to create a shade. It helps to keep the shade impact and is easy to blend by smudging them together.
Above shows Scumbling except the one on the right, the circles are more closer together to show a darker shade. On the left, the circles are found farther apart which results in a lighter shade than the one on the right.
   These are a few of the types of shading that you can use for your drawings. I'll even try to use these too! It might even help me than the other types of shading I tried in the past.

Saturday, December 10, 2016

Variety of brushes for a variety of colors

   When an artists comes to the conclusion that they want to start a painting, they need to get their supplies to create the piece. They need the paint (and everything else that has to "activate" their choice of paint), their canvas, an idea of what they are going to be painting, and of course, their brushes. This could be crucial to creating a piece because the choice of brushes really affect how easy or difficult it can be to create the painting. For example a brush with a thin tip will be much more tedious to color a whole canvas with that small tip, rather than a brush that has more bristles. It's not impossible to use the thin ended brush, just a lot more work.
   Let's start with the basics.

   These are not all the types of brushes out there, but it's only here to give you a good idea of what I am talking about. In the example I used before, a Pointed Round brush would be much harder to color a whole canvas with one color rather than a Bright or Flat brush in which there are much more bristles to cover the canvas, thus having more paint being splattered on.
   Each brush has it's purpose. The Round is good to use when creating thin marks such as filling in spaces or just adding detail to the painting. The Point Round is also very well used for adding detail and retouching your piece but the strokes are much more thin. The Flat and Bright brushes can both be used to create heavy strokes except the Bright brush would probably be used better up close rather than just applying the paint all loosely like the Flat Brush. The Filbert can be a combination of both a Round brush and a Flat brush because of it's thin point and because of how flat the bristles are. The fan brush however can be able to create unique strokes. It can be able to apply hair-like strokes and textures on the picture for leaves on a tree, or on a cloud in the sky. The angular flat can be able to create curved strokes, and is able to fill in spaces like all the other types of flat brushes. Then lastly, the detailed brush does what is named. It gives details to the paintings for it's small amount of bristles it has at the end of the brush.
   These are just a few out of many types of brushes. These are just here to start you off when creating your piece for the first time, or your second, or to refresh your memory in what the most common types of brushes do. Make sure to get the ones you need to create your piece, and you'll be just fine :)